
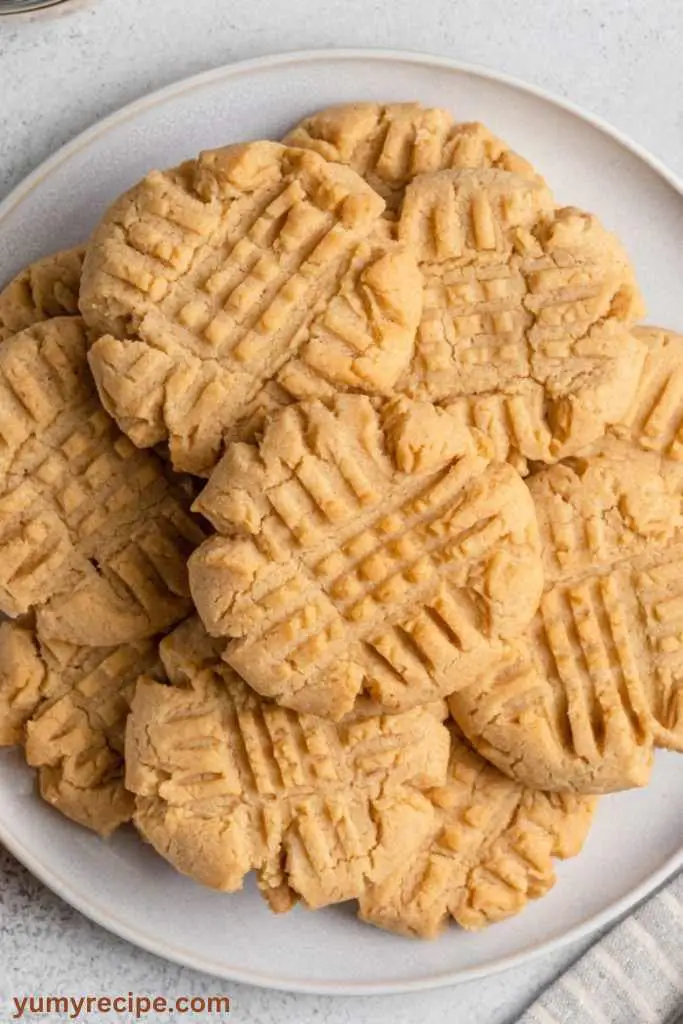
There’s nothing better than biting into a warm, fresh peanut butter cookie. The smell in the kitchen, the soft and crumbly texture, and the mix of sweet and salty flavors—it’s a simple treat that feels like a cozy hug for your taste buds.
Among the many recipes that promise to deliver this joy, the Joy of Cooking Peanut Butter Cookie Recipe stands out like a shining star. A classic recipe loved for generations, it combines great flavors with simple steps, making it a favorite for anyone who loves baking or peanut butter.
Whether you’re a seasoned baker or a home cook trying your hand at something new, this guide will walk you through everything you need to know to create these delightful cookies. From what makes this recipe special to simple tips for baking them perfectly, we’re here to help.
What Makes Joy of Cooking Peanut Butter Cookies So Special?
The Joy of Cooking is more than just a cookbook; it’s a classic. First published in the 1930s, it has been a favorite in many kitchens, filled with recipes that make cooking fun. One special recipe in the book is for peanut butter cookies.
What sets this recipe apart? It’s all about harmony:
- Balance of flavors: The recipe skillfully enhances the rich nuttiness of peanut butter with just the right amount of sweetness.
- Perfect texture: Crisp on the outside, and soft on the inside, it hits that sweet spot of cookie perfection.
- Universally appealing: Its simplicity makes it a crowd-pleaser for kids and adults alike without requiring advanced baking skills.
Ingredients Needed for Peanut Butter Cookies
These cookies are made with simple ingredients you already have at home, showing that delicious treats don’t need fancy stuff.
Here’s what you’ll need:
- 1/2 cup (1 stick) unsalted butter
- 1/2 cup granulated sugar
- 1/2 cup packed brown sugar
- 1 large egg
- 1/2 cup creamy peanut butter
- 1/2 teaspoon vanilla extract
- 1 1/4 cups all-purpose flour
- 3/4 teaspoon baking soda
- 1/4 teaspoon salt
Optionally, for a fun twist, you can add chocolate chips, chopped peanuts, or even drizzle melted chocolate on top after baking.
Nutritional Information of Peanut Butter Cookies
A little indulgence now and then is well-deserved, but it’s always helpful to know what you’re enjoying. On average, one peanut butter cookie made using this recipe contains:
| Nutrient | Amount per Cookie | Daily Value (%DV) |
|---|---|---|
| Calories | 120 | 6% |
| Total Fat | 8g | 12% |
| Saturated Fat | 2g | 10% |
| Cholesterol | 10mg | 3% |
| Sodium | 90mg | 4% |
| Total Carbohydrates | 10g | 3% |
| Dietary Fiber | 1g | 4% |
| Sugars | 7g | N/A |
| Protein | 3g | 6% |
This breakdown ensures you can enjoy these cookies with confidence, knowing exactly what’s in them.
Equipment Needed
Before you start, gather the following tools to streamline your baking process:
- Mixing bowls (at least two)
- Electric or hand mixer
- Measuring cups and spoons
- Baking sheet
- Parchment paper or silicone baking mat
- Cooling rack
- Fork (for creating that signature crisscross pattern)
Step-by-Step Recipe for Joy of Cooking Peanut Butter Cookies
Here’s how to transform those simple ingredients into irresistibly delicious cookies:
Step 1: Preheat the Oven and Prepare the Baking Sheet
Start by heating your oven to 350°F (175°C), so it’s ready for baking. While it heats up, cover your baking sheet with parchment paper or a silicone mat.
This will stop the cookies from sticking and make cleaning up easy. Getting everything ready helps your cookie-making go smoothly.
Step 2: Mix the Dry Ingredients
Take a medium mixing bowl and combine your dry ingredients. Usually, this includes flour, baking soda, and a pinch of salt.
Whisk these ingredients together until fully blended. This step ensures that your cookies have a balanced texture and consistent flavor throughout.
Step 3: Cream Together the Butter, Sugar, and Peanut Butter
Using a larger mixing bowl, cream together your butter, sugar, and peanut butter with an electric or hand mixer. Beat the mixture until it’s smooth and creamy, which usually takes a couple of minutes. This process creates a rich, flavorful base for your cookies and is key to their soft and chewy texture.
Step 4: Add the Egg and Vanilla
Crack an egg into the bowl with your creamed mixture, then pour in a splash of vanilla extract. Beat these ingredients together until fully incorporated. The egg adds moisture and structure, while the vanilla enhances the flavor, creating a harmonious balance within the dough.
Step 5: Combine the Wet and Dry Ingredients
Slowly add the dry ingredients to the wet ones, stirring as you go. Mix until it forms a soft dough, but don’t mix too much, or your cookies might not turn out right. The dough should come together now, and you’ll smell the yummy peanut butter.
Step 6: Shape the Dough into Balls
Using a tablespoon or a cookie scoop, portion out the dough and roll it into small balls, roughly an inch in diameter.
Place them evenly spaced on your prepared baking sheet. The uniform size will help the cookies bake evenly, ensuring that each one is as perfect as the last.
Step 7: Create the Crisscross Pattern
Take a fork, dip it lightly in sugar to prevent sticking, and gently press it onto each dough ball to flatten it slightly. Rotate the fork and press again to create the iconic crisscross pattern on top. This step not only makes the cookies visually inviting but also helps them bake evenly.
Step 8: Bake the Cookies
Place the baking sheet in your preheated oven and bake for 10-12 minutes. Keep an eye on the cookies—they should appear slightly golden, especially around the edges, but still soft in the center. Overbaking will result in dry cookies, so remove them just as they set.
Step 9: Cool and Enjoy
Take the cookies out of the oven and let them cool on the baking sheet for a few minutes. This makes them firm enough to move without falling apart. Once they’re cool enough to touch, they’re ready to eat. Enjoy with a glass of milk or as a tasty treat.
Congratulations, you’ve just made delicious peanut butter cookies. With this recipe, you can easily whip up a batch anytime you’re in need of a quick and indulgent snack.
And if you’re a cookie lover like me, you should also try our famous Keebler Danish Wedding Cookie, perfect for any special occasion.
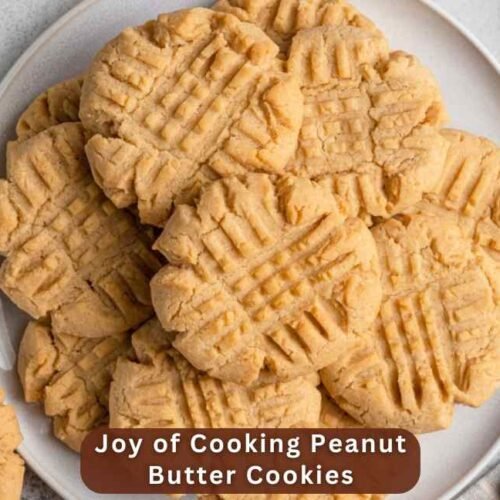
Joy of Cooking Peanut Butter Cookies Recipe
Equipment
- Mixing bowls (at least two)
- Electric or hand mixer
- Measuring cups and spoons
- Baking Sheet
- Parchment paper or silicone baking mat
- Cooling rack
- Fork (for creating that signature crisscross pattern)
Ingredients
- 1/2 cup 1 stick unsalted butter
- 1/2 cup granulated sugar
- 1/2 cup packed brown sugar
- 1 large egg
- 1/2 cup creamy peanut butter
- 1/2 teaspoon vanilla extract
- 1 1/4 cups all-purpose flour
- 3/4 teaspoon baking soda
- 1/4 teaspoon salt
Instructions
Step 1: Preheat the Oven and Prepare the Baking Sheet
- Start by heating your oven to 350°F (175°C), so it’s ready for baking. While it heats up, cover your baking sheet with parchment paper or a silicone mat. This will stop the cookies from sticking and make cleaning up easy. Getting everything ready helps your cookie-making go smoothly.
Step 2: Mix the Dry Ingredients
- Take a medium mixing bowl and combine your dry ingredients. Usually, this includes flour, baking soda, and a pinch of salt. Whisk these ingredients together until fully blended. This step ensures that your cookies have a balanced texture and consistent flavor throughout.
Step 3: Cream Together the Butter, Sugar, and Peanut Butter
- Using a larger mixing bowl, cream together your butter, sugar, and peanut butter with an electric or hand mixer. Beat the mixture until it’s smooth and creamy, which usually takes a couple of minutes. This process creates a rich, flavorful base for your cookies and is key to their soft and chewy texture.
Step 4: Add the Egg and Vanilla
- Crack an egg into the bowl with your creamed mixture, then pour in a splash of vanilla extract. Beat these ingredients together until fully incorporated. The egg adds moisture and structure, while the vanilla enhances the flavor, creating a harmonious balance within the dough.
Step 5: Combine the Wet and Dry Ingredients
- Slowly add the dry ingredients to the wet ones, stirring as you go. Mix until it forms a soft dough, but don’t mix too much, or your cookies might not turn out right. The dough should come together now, and you’ll smell the yummy peanut butter.
Step 6: Shape the Dough into Balls
- Using a tablespoon or a cookie scoop, portion out the dough and roll it into small balls, roughly an inch in diameter. Place them evenly spaced on your prepared baking sheet. The uniform size will help the cookies bake evenly, ensuring that each one is as perfect as the last.
Step 7: Create the Crisscross Pattern
- Take a fork, dip it lightly in sugar to prevent sticking, and gently press it onto each dough ball to flatten it slightly. Rotate the fork and press again to create the iconic crisscross pattern on top. This step not only makes the cookies visually inviting but also helps them bake evenly.
Step 8: Bake the Cookies
- Place the baking sheet in your preheated oven and bake for 10-12 minutes. Keep an eye on the cookies—they should appear slightly golden, especially around the edges, but still soft in the center. Overbaking will result in dry cookies, so remove them just as they set.
Step 9: Cool and Enjoy
- Take the cookies out of the oven and let them cool on the baking sheet for a few minutes. This makes them firm enough to move without falling apart. Once they’re cool enough to touch, they’re ready to eat. Enjoy with a glass of milk or as a tasty treat.
Notes
Creative Ways to Serve Peanut Butter Cookies
Who says peanut butter cookies need to be plain? Try these ideas for serving them:
- Cookie Sandwich: Fill two cookies with Nutella or marshmallow fluff for an indulgent snack.
- Ice Cream Topping: Sprinkle crumbled cookies over vanilla or chocolate ice cream for a simple, tasty dessert.
- Coffee Companion: Pair cookies with a cup of black coffee for a cozy café experience.
- Classic Combo: Savor the timeless duo of milk and cookies for a nostalgic treat.
- Cookie Parfait: Layer cookie crumbles, whipped cream, chocolate chips, and banana slices for a delicious parfait.
Storage Suggestions for Peanut Butter Cookies
To keep your cookies fresh and delicious:
- Keep Them in a Sealed Container: Use a sealed container to keep your cookies soft and fresh. Glass or plastic ones with tight lids work great.
- Separate Layers: Use parchment paper or wax paper to separate layers of cookies inside the container to avoid them sticking together.
- Cool, Dry Place: Keep the container in a cool, dry spot away from direct sunlight or heat. This helps preserve both texture and flavor.
- Freeze for Longevity: For longer storage, freeze the cookies. Place them in a freezer-safe bag or container, and they’ll stay fresh for up to three months. Simply thaw at room temperature when ready to enjoy.
Tips for Baking Perfect Peanut Butter Cookies
Even a simple recipe can benefit from a few expert tips:
- Use Creamy Peanut Butter: For a smooth and consistent texture, choose creamy peanut butter rather than chunky. It blends more evenly into the dough and ensures every bite is perfectly balanced.
- Chill the Dough: Refrigerating the dough for 30 minutes before baking helps prevent the cookies from spreading too much, resulting in thick and chewy treats.
- Don’t Overmix: Mix the ingredients just until combined to avoid overworking the dough. This keeps the cookies tender and prevents a tough final texture.
- Use a Fork for Signature Marks: Gently press a fork into the dough balls to create the classic crisscross pattern, which also helps the cookies bake evenly.
- Watch Baking Time: Peanut butter cookies can overbake fast. Take them out of the oven when the edges turn light golden, even if the center looks soft—they’ll harden as they cool.
The Perfect Recipe for a Perfect Day
There’s something uniquely comforting about baking peanut butter cookies—a nostalgic recipe that evokes warm memories for many of us. This Joy of Cooking recipe isn’t just about creating something delicious; it’s about connecting with the joy of making something from scratch and sharing it with others.
Why not try adding your own special ingredients or baking some as gifts to make someone smile? There’s no wrong way to enjoy these cookies—so grab your ingredients, heat up the oven, and enjoy the fun!
FAQ
Can I use natural peanut butter for this recipe?
Yes, you can use natural peanut butter, but keep in mind it may affect the texture and consistency of the cookies. Make sure to mix the peanut butter well before using it to evenly distribute the oils.
Can I replace butter with margarine?
You can, but butter is recommended for the best flavor and texture.
How can I make these cookies gluten-free?
You can swap all-purpose flour for a gluten-free flour blend. Just make sure the other ingredients, like baking powder and peanut butter, are also gluten-free.
Can I add chocolate chips or other mix-ins?
Sure! You can add chocolate chips, nuts, or dried fruit to these cookies. Just mix them into the dough before baking for more flavor.
How should I store the cookies after baking?
Once the cookies have completely cooled, store them in an airtight container at room temperature. They should stay fresh for up to a week. For longer storage, you can freeze them in a sealed container for up to 3 months.
Can I freeze the cookie dough?
Yes, you can! Shape the dough into balls and freeze them on a baking sheet until firm, then transfer to a freezer-safe bag or container. When ready to bake, simply place them on a baking sheet and bake as usual, adding an extra minute or two to the baking time.
What can I do if my cookies turn out too dry or crumbly?
This might happen if there’s too much flour or insufficient moisture in the dough. Be sure to measure your ingredients accurately, and if needed, you can add a splash of milk to the dough to improve the texture.