
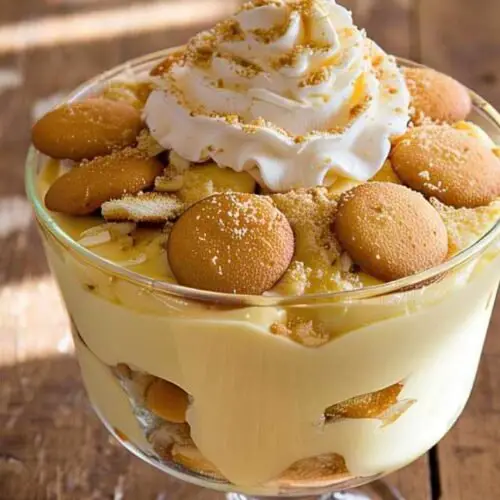
Oh, honey, if you’re craving a dessert that’s pure Southern comfort, Paula Deen banana pudding with vanilla wafers is calling your name. This creamy, dreamy classic layers sweet bananas, velvety pudding, and those iconic crispy wafers for a treat that’s like a hug in a bowl.
I remember my grandma whipping this up for Sunday suppers, and let me tell you, it’s got that nostalgic magic that makes everyone smile. Ready to dive into this easy, no-fuss recipe that’ll have your family begging for seconds?
Why People Love This Banana Pudding
This banana pudding is a crowd-pleaser for a reason. It’s got that perfect balance of creamy, sweet, and crunchy textures.
The vanilla wafers soak up the pudding just enough to soften without losing their charm. Bananas add natural sweetness, making every bite feel indulgent yet wholesome.
Paula Deen’s recipe keeps things simple, using everyday ingredients you probably already have. It’s the kind of dessert that feels fancy but comes together without breaking a sweat.
Ingredients You’ll Need
Before we get started, let’s gather everything for this deliciousness. Here’s what you’ll need to make Paula Deen’s banana pudding.
- 1 (12-ounce) box vanilla wafers
- 3-4 ripe bananas, sliced
- 1 (14-ounce) can sweetened condensed milk
- 1 (8-ounce) package cream cheese, softened
- 2 cups whole milk
- 1 (5-ounce) box instant vanilla pudding mix
- 2 cups cold heavy whipping cream
- 1/4 cup powdered sugar
- 1 teaspoon vanilla extract
Make sure your bananas are ripe but not mushy for the best texture. You can grab these ingredients at any grocery store, no specialty shops required.
Kitchen Tools for the Job
You don’t need a fancy kitchen to pull this off. A few basic tools will do the trick.
A large mixing bowl is key for blending the pudding and whipped cream. Grab a whisk or electric mixer for smooth results.
You’ll also need a 9×13-inch baking dish or a trifle bowl for layering. A spatula helps spread everything evenly.
If you want picture-perfect slices, a sharp knife for cutting bananas is handy. That’s it—let’s get to the fun part!
Step-by-Step Recipe Instructions
This recipe is all about layering and chilling for maximum flavor. Follow these steps, and you’ll have a masterpiece in no time.
Step 1: Prep the Pudding Mix
In a large bowl, whisk together the instant pudding mix and 2 cups of cold milk. Let it sit for 2-3 minutes until it thickens slightly.
Make sure the milk is cold for the pudding to set properly. Set this aside while you work on the next step.
Step 2: Blend the Cream Cheese Mixture
In another bowl, beat the softened cream cheese with the sweetened condensed milk until smooth. Use a whisk or electric mixer for a creamy texture.
This step adds that rich, tangy sweetness that makes the pudding irresistible. Fold this mixture into the prepared pudding.
Step 3: Whip the Cream
In a chilled bowl, whip the heavy cream, powdered sugar, and vanilla extract until stiff peaks form. This takes about 2-3 minutes with a mixer.
Gently fold half of the whipped cream into the pudding mixture. Save the other half for topping.
Step 4: Layer the Vanilla Wafers
Place a single layer of vanilla wafers at the bottom of a 9×13-inch dish or trifle bowl. You’ll use about a third of the box here.
Don’t worry if they overlap slightly—it’ll all come together. The wafers will soften as the pudding chills.
Step 5: Add Bananas
Lay a layer of sliced bananas over the wafers, using about half of your slices. Aim for even coverage so every bite has banana goodness.
Fresh, firm bananas work best to avoid mushiness. Keep the slices thin for easier eating.
Step 6: Spread the Pudding Mixture
Spoon half of the pudding mixture over the bananas and wafers. Use a spatula to spread it evenly, covering all the gaps.
This layer is where the creamy magic happens. Make sure it reaches the edges of the dish.
Step 7: Repeat the Layers
Add another layer of vanilla wafers, followed by the remaining banana slices. Top with the rest of the pudding mixture, spreading it smoothly.
You’re building that classic banana pudding look now. Take your time to keep the layers neat.
Step 8: Top with Whipped Cream
Spread the reserved whipped cream over the top of the pudding. For extra flair, crumble a few vanilla wafers and sprinkle them on top.
This final touch makes it look as good as it tastes. Smooth the cream evenly for a polished finish.
Step 9: Chill and Serve
Cover the dish with plastic wrap and refrigerate for at least 4 hours, or overnight for best results. This lets the flavors meld and the wafers soften.
Serve chilled straight from the fridge. Scoop into bowls or slice for a prettier presentation.
Tips for the Best Banana Pudding
Want to make your pudding even better? Here are some tried-and-true tips to elevate your dessert game.
- Use ripe but firm bananas to avoid a mushy texture.
- Chill your mixing bowl before whipping cream for faster results.
- Don’t skip the chilling time—it’s key for flavor and texture.
- For extra crunch, add a few fresh wafer crumbs right before serving.
- If bananas brown too quickly, toss slices in a little lemon juice before layering.
These small tweaks make a big difference in the final dish. Experiment to find what works for you.
Nutritional Information
Here’s a breakdown of the nutritional content per serving, based on 12 servings. Keep in mind, this is an indulgent treat, so enjoy in moderation!
| Nutrient | Amount per Serving |
|---|---|
| Calories | 420 kcal |
| Total Fat | 24g |
| Saturated Fat | 14g |
| Cholesterol | 70mg |
| Sodium | 280mg |
| Total Carbohydrates | 48g |
| Sugars | 36g |
| Protein | 6g |
Values are approximate and depend on specific brands used. If you’re watching calories, smaller portions still satisfy.
Serving Suggestions
This banana pudding shines on its own, but a few extras can make it even more special. Here are some ideas to serve it up right.
- Scoop into individual dessert cups for a fancy touch at parties.
- Pair with a hot cup of coffee or sweet tea for a Southern vibe.
- Garnish with a drizzle of caramel sauce for a decadent twist.
- Serve alongside fresh berries for a pop of color and flavor.
- Offer it as the star dessert at potlucks—it’s always a hit.
No matter how you serve it, this pudding brings smiles to the table. It’s versatile enough for any occasion.
Storing and Make-Ahead Tips
Banana pudding is best enjoyed fresh, but you can plan ahead. Here’s how to store it properly.
Refrigerate leftovers in an airtight container for up to 2 days. The bananas may brown slightly, but it’ll still taste great.
If making ahead, assemble up to the pudding layer and refrigerate. Add whipped cream and wafer crumbs just before serving.
Freezing isn’t recommended—it can make the texture watery. Stick to chilling for the best results.
These tips help you enjoy the pudding at its peak. A little planning goes a long way.
Why This Recipe Stands Out
Paula Deen’s banana pudding isn’t just another dessert—it’s a love letter to Southern tradition. The no-bake ease means anyone can make it, no chef skills needed.
The combo of creamy pudding, soft wafers, and sweet bananas is pure comfort food. It’s like a warm memory in every bite.
Whether it’s a family gathering or a weeknight treat, this recipe delivers. It’s simple, satisfying, and oh-so-shareable.
Summary
Paula Deen’s banana pudding with vanilla wafers is the ultimate no-bake dessert that brings Southern charm to any table. With creamy pudding, ripe bananas, and crunchy wafers layered to perfection, it’s a recipe that’s as easy as it is delicious. From the straightforward ingredients to the make-ahead convenience, this pudding checks all the boxes for a crowd-pleasing treat. Whip it up for your next gathering, and watch it disappear faster than you can say “y’all”!
FAQ
Can I use low-fat ingredients for this recipe?
You can swap in low-fat cream cheese or milk, but the texture may be less rich. Full-fat ingredients give the best creamy results.
How long does banana pudding last in the fridge?
It stays fresh for about 2 days when covered tightly. Bananas may brown slightly, but the flavor holds up.
Can I make this gluten-free?
Yes, use gluten-free vanilla wafers and check that your pudding mix is gluten-free. The rest of the ingredients should work fine.
What if I don’t have a trifle bowl?
A 9×13-inch baking dish works perfectly. Any deep dish will do as long as it holds the layers.
Can I add other fruits to the pudding?
Strawberries or peaches can complement bananas, but keep it light to avoid overpowering the classic flavor. Add them sparingly.
Paula Deen Banana Pudding Recipe with Vanilla Wafers
Equipment
- Large mixing bowl
- Whisk or electric mixer
- 9×13-inch baking dish or trifle bowl
- Spatula
- Sharp knife (for slicing bananas)
- Measuring cups and spoons
- Chilled bowl (optional, for whipping cream)
Ingredients
- 1 12-ounce box vanilla wafers
- 3-4 ripe bananas sliced
- 1 14-ounce can sweetened condensed milk
- 1 8-ounce package cream cheese, softened
- 2 cups whole milk
- 1 5-ounce box instant vanilla pudding mix
- 2 cups cold heavy whipping cream
- 1/4 cup powdered sugar
- 1 teaspoon vanilla extract
Instructions
Step 1: Prep the Pudding Mix
- In a large bowl, whisk together the instant pudding mix and 2 cups of cold milk. Let it sit for 2-3 minutes until it thickens slightly.
- Make sure the milk is cold for the pudding to set properly. Set this aside while you work on the next step.
Step 2: Blend the Cream Cheese Mixture
- In another bowl, beat the softened cream cheese with the sweetened condensed milk until smooth. Use a whisk or electric mixer for a creamy texture.
- This step adds that rich, tangy sweetness that makes the pudding irresistible. Fold this mixture into the prepared pudding.
Step 3: Whip the Cream
- In a chilled bowl, whip the heavy cream, powdered sugar, and vanilla extract until stiff peaks form. This takes about 2-3 minutes with a mixer.
- Gently fold half of the whipped cream into the pudding mixture. Save the other half for topping.
Step 4: Layer the Vanilla Wafers
- Place a single layer of vanilla wafers at the bottom of a 9×13-inch dish or trifle bowl. You’ll use about a third of the box here.
- Don’t worry if they overlap slightly—it’ll all come together. The wafers will soften as the pudding chills.
Step 5: Add Bananas
- Lay a layer of sliced bananas over the wafers, using about half of your slices. Aim for even coverage so every bite has banana goodness.
- Fresh, firm bananas work best to avoid mushiness. Keep the slices thin for easier eating.
Step 6: Spread the Pudding Mixture
- Spoon half of the pudding mixture over the bananas and wafers. Use a spatula to spread it evenly, covering all the gaps.
- This layer is where the creamy magic happens. Make sure it reaches the edges of the dish.
Step 7: Repeat the Layers
- Add another layer of vanilla wafers, followed by the remaining banana slices. Top with the rest of the pudding mixture, spreading it smoothly.
- You’re building that classic banana pudding look now. Take your time to keep the layers neat.
Step 8: Top with Whipped Cream
- Spread the reserved whipped cream over the top of the pudding. For extra flair, crumble a few vanilla wafers and sprinkle them on top.
- This final touch makes it look as good as it tastes. Smooth the cream evenly for a polished finish.
Step 9: Chill and Serve
- Cover the dish with plastic wrap and refrigerate for at least 4 hours, or overnight for best results. This lets the flavors meld and the wafers soften.
- Serve chilled straight from the fridge. Scoop into bowls or slice for a prettier presentation.