
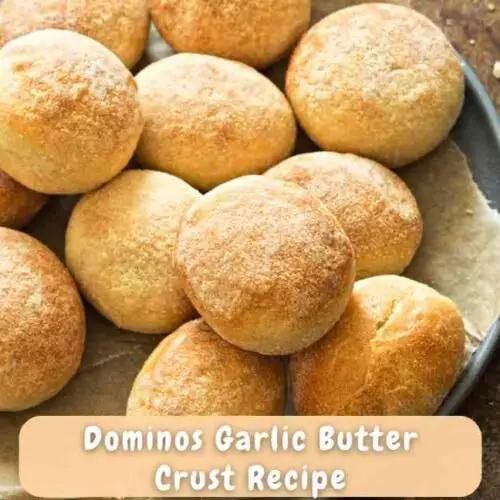
Making the famous Domino’s garlic butter crust at home is simpler than you think. This recipe will help you create a crust that has the tasty flavors of garlic butter, matching perfectly with your favorite pizza toppings.
Whether you’re a seasoned home cook or just starting out, this easy recipe guarantees tasty results. With just a few basic ingredients, you can enjoy the great flavor of Domino’s pizza at home which is perfect for family get-togethers, game nights, or a weeknight dinner.
Okay, so without wasting any more time let’s get started on making this mouth-watering garlic butter crust.
What Are Domino’s Garlic Butter Crust and Why Is It So Special?
Domino’s garlic butter crust has earned its place in the hearts of pizza lovers worldwide. But what makes it stand out? Is it the rich, buttery taste, or perhaps the fragrant burst of garlic with every bite? It’s all of the above and more. The secret is in the perfect mix of flavors that Domino’s has learned to create over the years.
This crust is not just a base for toppings—it’s an integral part of the pizza experience. Its soft, fluffy texture and crispy outside make it delicious. When you take that first bite, the garlic butter flavor excites your taste buds, making a regular pizza night feel special.
The appeal of Domino’s garlic butter crust is its flexibility. It goes well with many toppings which makes it a great choice for any pizza you want. Whether you love cheese or meat, this crust makes every slice taste amazing.
Ingredients Needed for Domino’s Garlic Butter Crust
To bring this iconic crust to life in your kitchen, you’ll need a few simple ingredients. These are pantry staples that, when combined, create magic.
- 2 1/4 cups all-purpose flour
- 1 packet (2 1/4 teaspoons) instant yeast
- 1 teaspoon sugar
- 1/2 teaspoon salt
- 3/4 cup warm water (about 110°F)
- 1 tablespoon olive oil
For the Garlic Butter:
- 1/4 cup unsalted butter (melted)
- 2 teaspoons garlic powder
- 1 teaspoon dried parsley
- 1/2 teaspoon salt
These are all simple ingredients that you probably already have at home. If not, they can easily be found at your local grocery store.
Nutritional Information of This Garlic Butter Crust
To help you enjoy your homemade Domino’s garlic butter crust responsibly, here is a detailed table with its nutritional information:
| Nutrient | Amount Per Serving* |
|---|---|
| Calories | 210 kcal |
| Total Fat | 9 g |
| Saturated Fat | 5 g |
| Trans Fat | 0 g |
| Cholesterol | 20 mg |
| Sodium | 330 mg |
| Total Carbohydrate | 28 g |
| Dietary Fiber | 1 g |
| Sugars | 1 g |
| Protein | 5 g |
Note: The values are based on one slice of garlic butter crust made using the recipe above. Adjust serving sizes according to your needs for more accurate nutritional information.
Equipment Needed
Creating a perfect garlic butter crust requires a few essential tools. These items will help you achieve the desired texture and flavor.
- Mixing Bowl
- Rolling Pin
- Baking Sheet or Pizza Stone
- Pastry Brush
- Oven Mitts
With these tools at your disposal, you’re well-equipped to tackle the task of creating a Domino-inspired garlic butter crust.
How to Make Domino’s Garlic Butter Crust
Okay, so now that we have all the necessary ingredients and equipment let’s start with the recipe.
Step 1: Prepare the Dough
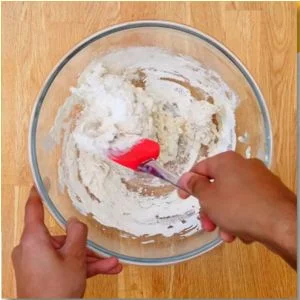
Start by mixing the flour, yeast, sugar, and salt in a big bowl. Slowly add warm water and olive oil while stirring with a wooden spoon or your hands until a dough forms. It should be a little sticky but not too wet. If it’s too dry, add a bit more water.
Step 2: Knead the Dough
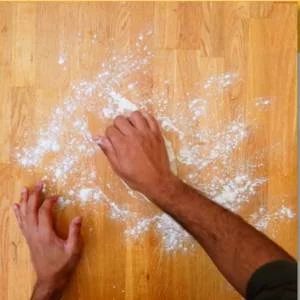
Move the dough onto a lightly floured surface. Use the heel of your hand to press down, then fold the dough over and press again. Keep doing this for about 5 to 7 minutes until the dough is smooth and stretchy. This helps build gluten, which gives the crust its chewy feel.
Step 3: Let the Dough Rise
Put the kneaded dough in a bowl with a little oil, then cover it with a clean kitchen towel. Put it in a warm area to rise for about an hour, or until it has doubled in size. This helps the yeast work, making air bubbles that will make the crust rise while baking.
Step 4: Shape the Dough
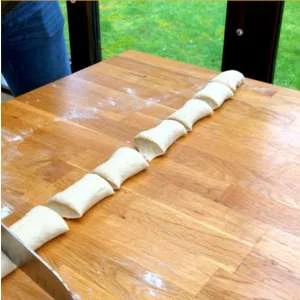
Once the dough has risen, gently punch it down to release excess air. Turn it out onto a floured surface and roll it with a rolling pin to your desired thickness. Aim for a circle that fits your baking sheet or pizza stone, ensuring even thickness for consistent baking.
Step 5: Preheat the Oven and Prepare the Garlic Butter
Preheat your oven to 475°F (245°C). In the meantime, mix the melted butter, garlic powder, dried parsley, and salt in a small bowl. Use a pastry brush to spread this mixture evenly over the crust. And make sure that the edges of the crust are coated too.
Step 6: Bake the Crust
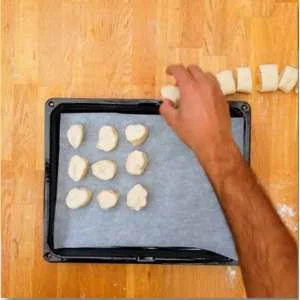
Transfer the prepared pizza base onto a baking sheet or pizza stone. Bake in your preheated oven for about 10 – 12 minutes, or until the crust turns golden brown and crispy on the edges. Check the baking to prevent any burning, especially around the edges.
Step 7: Enjoy Your Pizza
Once baked, remove the crust from the oven using oven mitts. Carefully slice it into pieces, top it with your favorite pizza toppings, or enjoy it as is. The garlic butter makes it very tasty. Serve it hot and enjoy your homemade garlic butter crust.
Dominos Garlic Butter Crust Recipe
Equipment
- Mixing bowl
- Rolling Pin
- Baking Sheet or Pizza Stone
- Pastry Brush
- Oven Mitts
Ingredients
- 2 1/4 cups all-purpose flour
- 1 packet 2 1/4 teaspoons instant yeast
- 1 teaspoon sugar
- 1/2 teaspoon salt
- 3/4 cup warm water about 110°F
- 1 tablespoon olive oil
For the Garlic Butter:
- 1/4 cup unsalted butter melted
- 2 teaspoons garlic powder
- 1 teaspoon dried parsley
- 1/2 teaspoon salt
Instructions
Step 1: Prepare the Dough
- Start by mixing the flour, yeast, sugar, and salt in a big bowl. Slowly add warm water and olive oil while stirring with a wooden spoon or your hands until a dough forms. It should be a little sticky but not too wet. If it’s too dry, add a bit more water.
Step 2: Knead the Dough
- Move the dough onto a lightly floured surface. Use the heel of your hand to press down, then fold the dough over and press again. Keep doing this for about 5 to 7 minutes until the dough is smooth and stretchy. This helps build gluten, which gives the crust its chewy feel.
Step 3: Let the Dough Rise
- Put the kneaded dough in a bowl with a little oil, then cover it with a clean kitchen towel. Put it in a warm area to rise for about an hour, or until it has doubled in size. This helps the yeast work, making air bubbles that will make the crust rise while baking.
Step 4: Shape the Dough
- Once the dough has risen, gently punch it down to release excess air. Turn it out onto a floured surface and roll it with a rolling pin to your desired thickness. Aim for a circle that fits your baking sheet or pizza stone, ensuring even thickness for consistent baking.
Step 5: Preheat the Oven and Prepare the Garlic Butter
- Preheat your oven to 475°F (245°C). In the meantime, mix the melted butter, garlic powder, dried parsley, and salt in a small bowl. Use a pastry brush to spread this mixture evenly over the crust. And make sure that the edges of the crust are coated too.
Step 6: Bake the Crust
- Transfer the prepared pizza base onto a baking sheet or pizza stone. Bake in your preheated oven for about 10 – 12 minutes, or until the crust turns golden brown and crispy on the edges. Check the baking to prevent any burning, especially around the edges.
Step 7: Enjoy Your Pizza
- Once baked, remove the crust from the oven using oven mitts. Carefully slice it into pieces, top it with your favorite pizza toppings, or enjoy it as is. The garlic butter makes it very tasty. Serve it hot and enjoy your homemade garlic butter crust!
Notes
Creative Ways to Serve Domino’s Garlic Butter Crust
If you thought Domino’s garlic butter crust was only for pizza, you’re in for a surprise. Here are some other creative ways to put this delicious crust to good use:
- Cheesy Breadsticks: Transform the crust into breadsticks by adding extra cheese before baking. Serve with marinara or ranch dipping sauce for a delightful appetizer or snack.
- Garlic Bread: Keep it simple by baking the crust with additional garlic and herbs. Cut into strips and pair with soups or pasta dishes for a comforting meal.
- Flatbread Sandwich: Use the baked crust as a flatbread. Fill the center with sandwich elements like grilled chicken, vegetables, and cheese, folding it over for a hearty meal.
- Dessert Twist: Before baking, sprinkle some cinnamon and sugar on the brushed butter. Once baked, drizzle with honey or chocolate sauce for a sweet treat.
- Customizable Toppings: Encourage creativity by letting individuals add their favorite toppings, from veggies to meats or a mix of cheeses, creating personalized pizza experiences.
For more delicious creations, explore our other popular recipes: the savory Domino’s Garlic Parmesan Sauce Recipe and the creamy Domino’s Alfredo Sauce Recipe. These sauces are great for making your homemade pizzas, pasta dishes, and even better.
Storage Suggestions
Proper storage of your garlic butter crust is important to maintain its freshness and flavor. Here are some high-quality storage tips:
- Refrigeration: If you plan to eat the garlic butter crust in a few days, keep it in a sealed container or wrap it in plastic wrap or foil. Put it in the fridge, where it will stay fresh for up to 3 days. Before serving, warm it in the oven at a low temperature to bring back its crunch.
- Freezing: If you want to store your crust for a long time, try freezing it. After it’s fully baked, let it cool completely, then wrap it tightly in plastic wrap and aluminum foil. This keeps it safe from freezer burn. Don’t forget to label it with the date and store it in the freezer for up to 2 months.
- Thawing and Reheating: When you’re ready to enjoy your frozen crust, transfer it from the freezer to the refrigerator overnight to thaw. To reheat, preheat your oven to 350°F (175°C) and bake for 10-15 minutes, or until thoroughly heated and crisp.
By following these storage suggestions, you can ensure that your Domino’s garlic butter crust retains its delectable flavor and texture, ready to be enjoyed at any time.
Tips for Making the Perfect Domino’s Garlic Butter Crust
So, you’ve tried our recipe and want to make it even better? Here are some tips for making the perfect garlic butter crust:
- Choose the Right Flour: Opt for bread flour instead of all-purpose flour. Bread flour has a higher protein content, which helps in forming more gluten that gives you a chewier crust similar to Domino’s.
- Accurate Measurements: Use a kitchen scale for precise measurements of your dry ingredients. This precision leads to a more consistent dough texture and rise.
- Water Temperature: For activating yeast, make sure the water is warm to the touch but not hot, between 105°F and 110°F (40°C to 43°C). Too hot, and it will kill the yeast; too cold, and it will not activate properly.
- Slow and Steady Kneading: Gently knead the dough to build gluten, making sure it’s elastic and smooth for the perfect crust.
- Optimal Rising Conditions: Allow the dough to rise in a warm, draft-free area. The ideal temperature is around 75°F (24°C) to encourage a proper rise, resulting in a light and airy crust texture.
- Thickness Consistency: When rolling out the dough, ensure even thickness to avoid uneven cooking. Using a rolling pin with thickness rings can help with this.
- Generous Garlic Butter Application: Don’t skimp on the garlic butter mixture, as this not only adds flavor but also enhances the golden-brown crust finish. Ensure the edges are well coated for a complete tasting experience.
- Pre-baking Tips: Think about baking the crust a little before adding toppings, especially if they are wet. This helps prevent a soggy bottom and keeps the crust nice and crunchy.
- Baking Surface Options: A pizza stone can make your crust better by spreading heat evenly, which gives you a crispier bottom. Be sure to preheat the stone with the oven for the best results.
Conclusion
In conclusion, learning how to make a great Domino’s garlic butter crust at home is not only a fun cooking achievement but also a nice way to enjoy your own creations. By using creative serving ideas and following simple tips for making and storing, you can keep your garlic butter crust a tasty and flexible base for many dishes. Whether you enjoy it immediately or save it for later, this crust will be a hit at any table.
FAQ
Can I use whole wheat flour instead of all-purpose flour?
Yes, you can substitute whole wheat flour, but keep in mind that it may result in a denser crust. You might want to try a mix of whole wheat and all-purpose flour for a balanced texture.
Is it possible to make this crust gluten-free?
Yes, you can make a gluten-free version by using a gluten-free flour blend specifically designed for baking. Make sure to also check that all other ingredients, like baking powder or yeast, are labeled gluten-free to prevent cross-contamination.
How can I make the crust extra crispy?
To make the crust extra crispy, ensure even thickness when rolling out the dough and bake it on a preheated pizza stone for uniform heat distribution. Additionally, pre-bake the crust for a few minutes before adding toppings to prevent sogginess.
Can I make the dough ahead of time?
Yes, you can prepare the dough in advance. After kneading, allow it to rise, then punch it down and store it in an airtight container in the refrigerator for up to 24 hours. Let it come to room temperature before rolling it out to ensure easy handling and even cooking.
What can I do if the dough is too sticky?
If the dough is too sticky, sprinkle a little flour on it and keep kneading until it feels right. Just be careful not to add too much flour, or the crust might get tough. A bit of stickiness is normal.
Can I infuse the crust with extra flavor?
Yes, you can add more flavor by mixing herbs and spices into the dough. Try adding minced garlic, dried oregano, basil, or a little parmesan cheese before kneading. You can also brush the baked crust with flavored oils like roasted garlic or herbed olive oil for extra taste.
Can I use this recipe in a bread machine?
Yes, you can use a bread machine to make the dough. Just add the ingredients as your machine suggests and set it to the dough cycle. When it’s done, shape and bake the crust according to your recipe.
This crust tasted amazing and was easy to make!
We’re thrilled you enjoyed it!
The step-by-step instructions were super helpful for a newbie like me.
Happy to hear it was helpful!
Substituted with gluten-free flour, and it still came out perfect
Awesome!
The crispy edges were exactly what I wanted!
Great to know those tips paid off!
Made it for a family dinner, and everyone loved it!
Family love is the best compliment.
The garlic butter really hits the spot. So flavorful!
Garlic butter definitely adds a delicious touch.
I froze half of it and it was still tasty after reheating.
Freezing works wonders, doesn’t it?
Impressed by how chewy and flavorful it was.
The right flour really makes a difference.
Used my bread machine for the dough—turned out so well.
Bread machines make baking so convenient.
Tried a mix of herbs in the crust, and it was fantastic.
Thankx!