
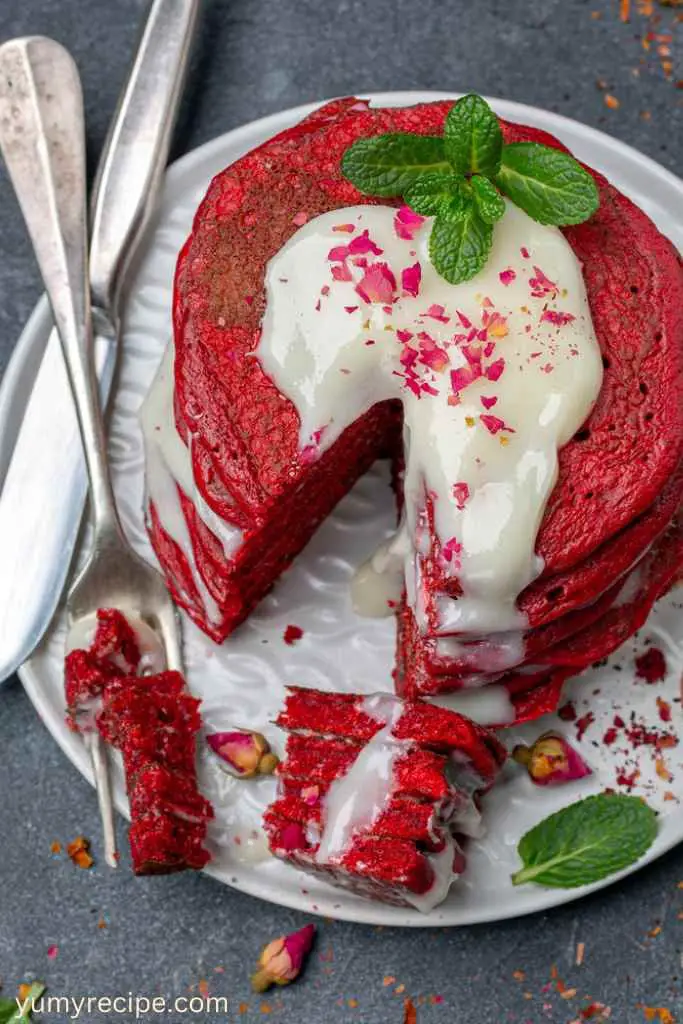
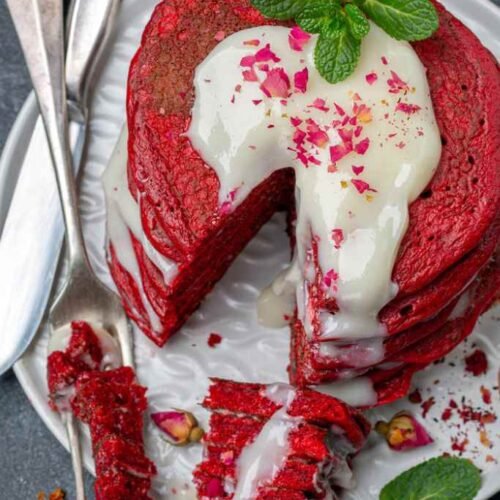
Picture this—fluffy pancakes with a crimson hue, their velvety texture almost melting in your mouth as a hint of cocoa dances across your taste buds. Topped with a swirl of rich cream cheese glaze, these Red Velvet Pancakes are a feast for both the eyes and the soul.
So whether you’re planning a surprise breakfast for someone special or looking to elevate your brunch game, red velvet pancakes are the ultimate indulgence. Keep reading to find an easy recipe, simple tips, and fun serving ideas to make your breakfast the best at home.
So without wasting any more time let’s jump straight into the recipe for these delicious Red Velvet Pancakes.
What Are Red Velvet Pancakes and Why Are They So Special?
Red velvet pancakes are inspired by the classic red velvet cake. They boast a smooth and soft texture with the signature tang of buttermilk and a touch of cocoa for depth of flavor.
The striking red color makes them both visually appealing and perfect for celebrations like Valentine’s Day, and Mother’s Day, or simply to add a pop of color to your brunch table.
What truly makes these pancakes special is the decadence they bring to breakfast. They’re not just pancakes—they’re an experience in luxury and indulgence.
Ingredients Needed for Red Velvet Pancakes
Before you start whisking and flipping, gather these ingredients to make your masterpiece:
For the Pancakes:
- 1 ¾ cups all-purpose flour
- 2 tablespoons unsweetened cocoa powder
- 3 tablespoons granulated sugar
- ½ teaspoon baking soda
- 1 teaspoon baking powder
- ¼ teaspoon salt
- 1 large egg
- 1 ¼ cups buttermilk (room temperature)
- 2 tablespoons unsalted butter (melted)
- 1 teaspoon vanilla extract
- 1 teaspoon red food coloring (adjust for your desired intensity)
For the Cream Cheese Glaze:
- 4 ounces cream cheese (softened)
- 1 cup powdered sugar
- 1 teaspoon vanilla extract
- 2-3 tablespoons milk (to achieve drizzling consistency)
These pantry essentials combine to create magic on your breakfast plate.
Nutritional Information of Red Velvet Pancakes
Here’s a breakdown of the approximate nutrition per serving (3 pancakes):
| Nutrient | Amount per Serving (3 Pancakes) |
|---|---|
| Calories | 320 |
| Total Fat | 12g |
| Saturated Fat | 6g |
| Cholesterol | 55mg |
| Sodium | 310mg |
| Total Carbohydrates | 45g |
| Dietary Fiber | 1g |
| Sugars | 20g |
| Protein | 6g |
| Vitamin A | 8% of Daily Value |
| Calcium | 10% of Daily Value |
| Iron | 6% of Daily Value |
This table provides a clear snapshot of the nutritional content in every serving of these delectable red velvet pancakes, ensuring you’re well-informed about the balance of indulgence and nourishment.
Equipment Needed
Make sure you have the following tools on hand for a seamless cooking process:
- Mixing bowls (one for dry ingredients, one for wet)
- Whisk and rubber spatula
- Measuring cups and spoons
- Non-stick skillet or griddle
- Ladle or measuring cup for pouring batter
- Offset spatula for spreading glaze (optional)
With these tools, you’re set for a mess-free, enjoyable cooking experience.
Recipe for Red Velvet Pancakes
Now that you have all the info you need, it’s time to start cooking! Follow these easy steps to make red velvet pancakes that will wow everyone.
Step 1: Prepare the Dry Ingredients
Start by mixing the dry ingredients in a bowl. Add flour, sugar, cocoa powder, baking powder, and a little salt. Stir them well with a whisk to make sure everything is mixed evenly and there are no lumps. This helps you get a smooth pancake batter with the perfect texture.
Step 2: Mix the Wet Ingredients
In another bowl, mix the wet ingredients. Combine buttermilk, eggs, vanilla extract, and a little red food coloring. Stir until the mixture is smooth and evenly colored. The buttermilk makes the pancakes soft, and the red color makes them look amazing. Make sure everything is well mixed before continuing.
Step 3: Add the Two Mixtures
Slowly pour the wet mixture into the bowl with the dry ingredients. Gently mix with a rubber spatula until everything is combined. Don’t mix too much, or the pancakes might turn out tough. It’s okay if the batter has a few small lumps — they’ll disappear as the pancakes cook.
Step 4: Heat the Cooking Surface
Preheat your non-stick skillet or griddle over medium heat. Lightly grease the surface with butter or a neutral-flavor oil to ensure the pancakes don’t stick. To test readiness, sprinkle a few drops of water on the pan; if the droplets sizzle and evaporate quickly, it’s time to start cooking.
Step 5: Cook the Pancakes
Use a ladle or measuring cup to pour the batter onto the hot pan to make even pancakes. Cook each one for 2-3 minutes, until the edges look firm and bubbles appear on top. Flip carefully with a spatula and cook for another 1-2 minutes until the pancakes are fully cooked and have a rich red color.
Step 6: Serve and Garnish
When the pancakes are ready, place them on a plate and keep them warm while you make the rest. For a yummy red velvet treat, stack the pancakes and add lots of cream cheese glaze or whipped cream on top. Sprinkle some powdered sugar or add fresh berries to make it look extra nice. Now, enjoy your tasty pancakes.
If you are a pancake lover, you should try some of our famous pancake recipes like Banana Oatmeal Protein Powder Pancakes and Joy of Cooking Buttermilk Pancakes to elevate your breakfast game.
Red Velvet Pancakes Recipe
Equipment
- Mixing bowls (one for dry ingredients, one for wet)
- Whisk and rubber spatula
- Measuring cups and spoons
- Non-Stick Skillet or Griddle
- Ladle or measuring cup for pouring batter
- Offset spatula for spreading glaze (optional)
Ingredients
For the Pancakes:
- 1 ¾ cups all-purpose flour
- 2 tablespoons unsweetened cocoa powder
- 3 tablespoons granulated sugar
- ½ teaspoon baking soda
- 1 teaspoon baking powder
- ¼ teaspoon salt
- 1 large egg
- 1 ¼ cups buttermilk room temperature
- 2 tablespoons unsalted butter melted
- 1 teaspoon vanilla extract
- 1 teaspoon red food coloring adjust for your desired intensity
For the Cream Cheese Glaze:
- 4 ounces cream cheese softened
- 1 cup powdered sugar
- 1 teaspoon vanilla extract
- 2-3 tablespoons milk to achieve drizzling consistency
Instructions
Step 1: Prepare the Dry Ingredients
- Start by mixing the dry ingredients in a bowl. Add flour, sugar, cocoa powder, baking powder, and a little salt. Stir them well with a whisk to make sure everything is mixed evenly and there are no lumps. This helps you get a smooth pancake batter with the perfect texture.
Step 2: Mix the Wet Ingredients
- In another bowl, mix the wet ingredients. Combine buttermilk, eggs, vanilla extract, and a little red food coloring. Stir until the mixture is smooth and evenly colored. The buttermilk makes the pancakes soft, and the red color makes them look amazing. Make sure everything is well mixed before continuing.
Step 3: Add the Two Mixtures
- Slowly pour the wet mixture into the bowl with the dry ingredients. Gently mix with a rubber spatula until everything is combined. Don’t mix too much, or the pancakes might turn out tough. It’s okay if the batter has a few small lumps — they’ll disappear as the pancakes cook.
Step 4: Heat the Cooking Surface
- Preheat your non-stick skillet or griddle over medium heat. Lightly grease the surface with butter or a neutral-flavor oil to ensure the pancakes don’t stick. To test readiness, sprinkle a few drops of water on the pan; if the droplets sizzle and evaporate quickly, it’s time to start cooking.
Step 5: Cook the Pancakes
- Use a ladle or measuring cup to pour the batter onto the hot pan to make even pancakes. Cook each one for 2-3 minutes, until the edges look firm and bubbles appear on top. Flip carefully with a spatula and cook for another 1-2 minutes until the pancakes are fully cooked and have a rich red color.
Step 6: Serve and Garnish
- When the pancakes are ready, place them on a plate and keep them warm while you make the rest. For a yummy red velvet treat, stack the pancakes and add lots of cream cheese glaze or whipped cream on top. Sprinkle some powdered sugar or add fresh berries to make it look extra nice. Now, enjoy your tasty pancakes!
Notes
Creative Ways to Serve Red Velvet Pancakes
Elevate your red velvet pancakes with these fun serving ideas:
- Build a Pancake Tower: Stack your pancakes and add cream cheese glaze or chocolate sauce between each layer. Finish it off with sprinkles, fresh fruit, or syrup for a fun and tasty centerpiece.
- Pair with Ice Cream: Turn your pancakes into a dessert by serving them with a scoop of vanilla or strawberry ice cream, finished with hot fudge or caramel sauce.
- Shape Them for Fun: Use cookie cutters to create heart-shaped or star-shaped pancakes for a festive touch. Perfect for holidays, birthdays, or special breakfasts.
- Turn Them Into Breakfast Sandwiches: Use two red velvet pancakes as “buns,” and fill them with whipped cream, fresh strawberries, and a drizzle of honey for a handheld delight.
- Create Pancake Skewers: Cut pancakes into smaller pieces and thread them onto skewers, alternating with fruit like strawberries and bananas. Serve with a side of dipping sauces, such as maple syrup or chocolate sauce.
- Add a Savory Twist: Experiment with sweet-savory combinations by topping your pancakes with crispy bacon, a fried egg, and a drizzle of hot honey.
Get creative and make your red velvet pancakes a memorable breakfast or dessert experience!
Storage Suggestions
Here are some tips for storing leftover pancakes and maintaining their freshness:
- Refrigerate: Store cooked pancakes in an airtight container or zip-top bag, separated by sheets of parchment paper or wax paper. They will stay fresh for up to 3 days.
- Freeze: If you have extra pancakes, freeze them in a single layer on a baking sheet lined with parchment paper. Once frozen, transfer them to a freezer-safe bag and store for up to one month.
- Reheat: To enjoy your leftover pancakes, simply microwave them for 20-30 seconds or reheat them on a non-stick skillet over medium heat until warmed through.
Tips for Making Perfect Red Velvet Pancakes
I know you’re eager to get cooking, but before you dive in, here are some tips to make sure that your pancakes turn out perfect every time:
- Measure Precisely: Use measuring cups and spoons for accurate quantities. Baking is a science, after all!
- Avoid Over-Mixing: As mentioned earlier, be gentle when mixing the batter. Stir just until everything is combined.
- Use Buttermilk: The acidity in buttermilk helps activate the baking powder and gives these pancakes a delicate texture.
- Don’t Skip Sifting: To avoid lumps in your dry ingredients, make sure you sift them through a fine-mesh strainer before adding them to the wet mixture.
- Control the Heat: Use medium heat and avoid cooking pancakes on high heat, so they don’t burn on the outside before being fully cooked on the inside.
- Experiment with Toppings: Don’t be afraid to experiment with different toppings and flavor combinations. From whipped cream to chocolate chips to fruit, the possibilities are endless!
Now that you have all the tools and tips you need, it’s time to get creative and make some delicious red velvet pancakes. Happy cooking! ˇ(⌒_⌒)ˇ.
Conclusion
Cooking is more than just a daily task—it’s a chance to bring joy, creativity, and flavor to your life. Whether you’re perfecting recipes like red velvet pancakes or experimenting with your own culinary creations, every moment in the kitchen can be an opportunity to express yourself and connect with others.
Remember, it’s the little touches, like careful preparation and thoughtful toppings, that make a dish truly special. So, gather your ingredients, put on your favorite music, and enjoy the magic of cooking.
FAQ
Can I Make a Gluten-Free Version?
Yes, you can make a gluten-free version by using gluten-free flour or flour blends as a substitute. Be sure to check that all other ingredients are also gluten-free.
What Can I Use Instead of Buttermilk?
You can use a mixture of milk and lemon juice or vinegar as a substitute. Combine 1 cup of milk with 1 tablespoon of lemon juice or vinegar, let it sit for 5–10 minutes, and you’ll have a homemade alternative to buttermilk.
Can I Skip the Food Coloring?
Yes, you can skip the food coloring. The pancakes will still taste delicious but will lack the signature red hue of traditional red velvet.
Can I Store Leftover Pancakes?
Yes, you can store leftover pancakes. Simply place them in an airtight container and refrigerate for up to 3 days, or freeze them for up to 2 months. Reheat in the microwave or toaster for a quick and easy meal.
Can I Use Plant-Based Milk?
Yes, plant-based milk like almond, soy, or oat milk can be used as a substitute for regular milk. Keep in mind that this might slightly change the flavor, but it will still result in delicious pancakes.
How Do I Ensure My Pancakes Are Fluffy?
To ensure your pancakes are fluffy, avoid overmixing the batter. Stir the ingredients just until combined, leaving some lumps. Overmixing can lead to dense pancakes.